Sunday, September 13, 2009

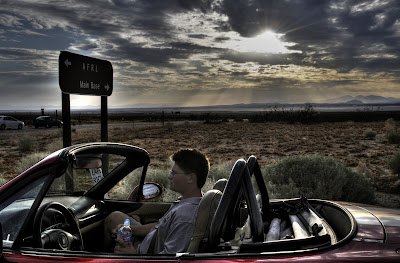
Godbeams and Shadow Details


OK, most of the population doesn't even give a rip about HDR, or for that matter, have the slightest idea what it means even after you tell them it means High Dyanamic Range. But you're not most of the population. You scour the internet to read photo blogs, you get emails from DigitalPhotographySchool.com every morning and don't consider them spam, and you time your vacation request so you can shoot the full moon rising over Half Dome just like Ansel. But you still don't try HDR? Why? Reason #1, you've got to use a tripod. Reason #2 it's too complicated. Reason #3, you've got to buy special software. Well, here's an end around all three excuses. Number one, using the tripod. In order for HDR to work, you need to take multiple exposures of the (almost) exact same scene. With a still life, this is easy. With people, it's not. The shot you see here was shot handheld, but I used auto bracketing to take three separate exposures at +1.0/0/-1.0 exposure compensation in less than 1 second. Auto bracketing gets you around the tripod issue as long as you hold the camera steady for the whole tic-a-tic sequence. Number two, it's too complicated. No, not if you get the auto bracketing thing down and find a subject that doesn't have a lot of things that move in it. You need at least a three shot sequence, and you need to download a program called Photomatix from the web, pick out the three shot sequence, and drop the three images into Photomatix and follow the menu. Number three, it's too expensive. No, Photomatix lets you download their program for a long time for free. Eventually, it starts to put a watermark on your images to coerce you to buy the key, but by that time, you'll have made up your mind and you'll probably either love or hate HDR photos. Personally, I'm somewhere in the middle. I like the airbrushed look that HDR can produce, but I'm also kind of a purist who wants a shot to work right through the lens with no image manipulation. I do like HDR, and I use it when I've got extremely high contrast scenes to deal with that I know my chip won't be able to handle any other way. I go into this knowing ahead of time there's a risk my shot's going to look like the latest World of Warcraft ad graphic. The godbeams, and the details inside the car would never have shown up in a single exposure of this scene, but with the computer picking out the best of each of the three images, it's a winner. That is, unless you're one of those people who hates HDR, and most of the people who fall into that category are jealous photographers who've either never tried it or tried it but quit.

Thursday, August 6, 2009

Balancing Act With Light


This isn't exactly a simple technique for photographers, but hey, film is cheap when you're using a digital camera, so give it a try. The important thing about shifting your camera into manual everything is it gives you control. Get out of program mode, get out of autofocus, and get your electronic flash on a cord, or even better, on wireless setting! Now you're cooking with gas. The lighting for your background is determined by the amount of light that's able to pass through your lens and the amount of time your shutter is open. Find a shutter speed and aperture that works to give your background sky the deep rich blue color you get in the 15 minutes after sunset! This will probably take a slow enough shutter speed to make quite a bit of motion blur in your shot. Now comes part B! Freeze your subject in the foreground with an instant of blinding light in their face. This technique uses manual exposure, manual shutter speed, and manual focus. The only thing on auto is your TTL flash, which should get the foreground lit right if you dial up the power using about +1 stop of flash compensation. Hard work to get it right, but worth the wait when you pull it off successfully. Oh, and this may sound weird to some of you, but if you trust in Jesus, and read his word, and pray over your camera gear that you can use it it a way that honors him, it makes a difference in your pictures, as well as in your life.

Monday, June 22, 2009

The Exposure Trick That (Almost) Never Fails!


The three shots above definitely have one thing in common. They're all difficult to meter. At Yellowstone National Park, all the pictures from the "front side" of the geyser were way too cliche. Getting away from the masses, I found this couple sitting on a trailside. The backlighting of the water was glorious, and there were dark shadows in the foreground. With the limited dynamic range of today's digital cameras, getting the right exposure becomes absolutely critical. The Griffith Observatory in the hills over downtown LA presented a similar challenge, though this time the only backlighting was a faint glow in the blackening evening sky. The windows with their incandescent glows cast a bold, almost candlelight orange hue to complete the scene. The church with a diffraction fringe around the top of the steeple completes the set of three problem lighting conditions. Though there are a lot of tricks of the trade that can be employed to bring out all of these shots, but it's not about post processing using photoshop layers, shooting in .raw and tweaking the levels, or using auto bracketing. Whenever you're faced with a difficult contrasty landscape scene like these there's amazingly simple cure to help nail critical exposure. Meter the sky.

Sunday, April 12, 2009

Behind the Scenes Easter!


Shepherd of the Hills put on an absolutely amazing Easter service today, but the credit all goes to JESUS! It's something that really touches your heart when you see how God shows up in the lives of ordinary people, and in His name, something extraordinary happens. Two services, 8500 seats, 900 volunteers, and a whole lot of lives changed by the experience.
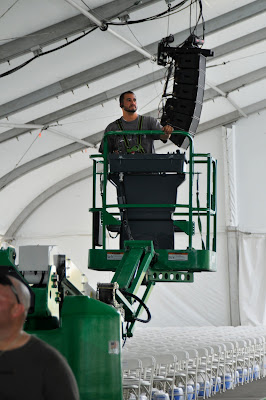
The pictures you see above are all part of a behind the scenes look at the whole production. The dancers and choir in their jeans and shorts doing their final sound checks on Saturday before Easter, the director and the technical director working a live edit in the video production truck, the band's percussion section, and the riggers are all part of the hard work that leads up to the event.

This article is more than a story about all the behind the scenes work that went into Easter services at Shepherd of the Hills church. The one thing I can tell anyone interested in building their artistic talents is GET INVOLVED! The experience you will gain will stay with you for a lifetime. At a megachurch, think of all the resources of talent you will find. Our video production crew is mostly made up of working professionals. The same thing is true for the praise team singers, the sound people, the riggers, the emergency response teams, and many other positions. Sure, we all have our businesses to run, but there's more to life than your day job. Of course, by becoming involved you'll meet people who can help you take your artistic talents to a higher level. Of course, you'll be able to do amazing things you never would have thought possible. There are so many secular reasons to become involved with a group of people like this for purely self-motivated reasons. Drop in any time! I'm usually on camera for the Saturday evening service. So come by and stay for the praise and worship singing even if you're not really into the whole Jesus thing. God is looking for worshippers, but if you want to just come and hang around and listen to some really talented singers, feel free to come enjoy a first rate gospel music experience.
And oh yea, that Jesus guy, he just might show up in your life too....

Saturday, April 11, 2009

Addicted to Speed


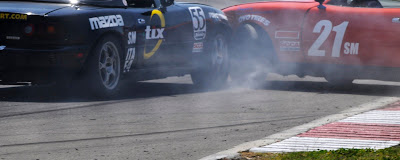
There's certainly an art to sports photograpy, and a lot of wildlife photographers have come to realize that the art of shooting race car drivers or football players is quite similar to the art of catching an animal in action. Split second timing, and conciousness of both the foreground and background, and critical focusing all come into play. Patience, and cat-like reflexes come into play. Of course, being at the right place to get the picture and having all the right presets programmed into your camera make a difference too. Look at the setup where the photographer in the yellow vest is photographing the oncoming race traffic. There's a little bit of K-rail and a chain link fence with some big cutouts in it. Having a big lens like the 300 f2.8 ends up being a help because you can put it in aperture priority mode at, say, f4, and have a nice shallow depth of field, which helps isolate your subject, the oncoming car, from the background cars behind it.


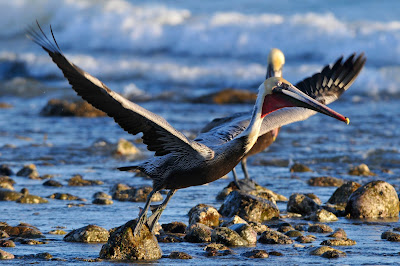
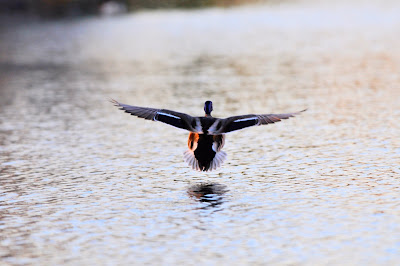
A lot of wildlife photography involves anticipating what the animal's going to do next. In cases like the duck coming in from a landing, this is easy. The takeoffs, however take a little more knowedge to capture. Understanding how the animal thinks may pay off here. Just like knowing your way around a racetrack helps with race car photography . Every track has spots that are good for passing. Every passing attempt has a setup. It's a lot easier to see this from the driver's seat that it is from the sidelines. If you see the track from a driver's eye, you're going to learn how to shoot. If you see the lake from the bird's eye, it's got approach flight paths, landing zones, and good places to start takeoff runs. There are rivalries and ground the competitors try to hold on to. The racetrack and the wildlife sanctuary aren't too different from each other once you get to know them. The racer setting up a pass gives up a little entrance speed on the proceeding corner so he can be slow in, but get on the throttle earlier as he comes out. The bird looking to take off may look right, and then left, and then hit the gas.
If we want to understand car racing, we can read books. Alternatively, we can get an SCCA membership, join a car club, take some hot laps at an open track session or an HPDE event, or even go to a race driving school. Of course, when it comes to wildlife photography, we can't become a bird for a day, so our best course of action is to read books about animals and learn everything about them before we go out in the field. In both auto racing and wildlife photography, a little bit of homework before the shoot goes a long way.
One other parallel. The big holes in the fence give you the opportunity to get a great shot, but something dangerous that you didn't anticipate might fly out at you. So do your homework, stay alert, and go get that once in a lifetime shot!

Thursday, April 2, 2009

High Contrast Images Under Construction


I had a conversation with a gallery owner named Ruth the other day. She and I have both been around photograpy for a long time now, and we each had some of our old stories of "back in the days." Now don't worry, this isn't going to turn into a monologue about how when we were kids in order to get to school we had to walk five miles through the snow carrying our desks.
I remember the old days before digital. You could do all sorts of special effects back then. They had tools like rubylith, and register pins, and internegatives, and lithographic film. The trouble was, most of these tools were too time consuming and hard to use, so most people didn't use them.
Today, digital cameras are easy to use, and instead of shooting 36 or 72 shots at the homecoming game, you can shoot 900. When the cops went from six shooter revolvers to autoloaders with 18 round magazines, it gave the good guys more firepower in a gunfight, but departments quickly learned that the "spray and pray" mindset was dangerous.
The exact same thing is true in digital photography. "Spray and pray" doesn't work if you don't grasp a technical barrier in front of you. In the case of the two photos above, the technical barrier is high dynamic range. Even if we expose for the blue sky and let the let the silouettes go completely black, the details on the sunlit ground end up being too dark to make a good print. Why? Because a .jpg has really limited dynamic range. But there's an easy solution. By switching my exposure quality from .jpg to .raw, I picked up enough dynamic range to get the foreground look I wanted in the shots. I then took the .raw image and opened it up in PhotoShop's camera raw converter. I open a normal version of the file, which was properly exposed by metering off the blue sky when I shot the image. After that, Iopened up a second vesion of the .raw file, tweaking the contrast settings in the camera raw editor to get the light I wanted in the foreground areas. It was then a simple matter to sandwich the two versions of the same .raw file on top of one another in photoshop, and mask away the washed out sky using a layer mask (which is actually a tool that's been around since before photoshop was born.) To make a layer mask back in the old days, you had to spend hours using an x-acto knife and a sheet of rubylith, so nobody did it. Now it's easier, but you'll only find the solution to the problem if you're inquisitive enough to realize there are times when shooting more .jpg's won't solve the problem, and you need to get out of "spray and pray" mode to find the answer.

Thursday, January 29, 2009

A full cut of CTO?


A full cut of CTO? What on earth is that, and why could I possibly need it? Whenever I go out on a shoot, I'm always thinking about how to take my photography to the next higher level.

When you go out shooting a portrait, are you concentrating a lot of your energy on making sure your pictures are sharply focused? For most of us, the answer is no. Sure, we put a certain amount of effort into making sure that the lens is focused, especially with new equipment, but after a while, focusing becomes second nature. Let's think beyond that. What's going on with the background, and with the light. It's outdoors, and it's about 3:30 in the afternoon, still a little too early for the golden light. The sunlight is behind our model Rosalyn's right shoulder. It's a day after a rainstorm. The grass is a gorgeous green and the skys are clear and blue. Due to some harsh sun backlighting her, it's clear that I'm going to need to add some light on Rosalyn's face, but if I just blast away with an electronic flash, the shot's going to look cold.

With a new Nikon, there are lots of times you can shoot without even thinking about white balance, but this was not one of those times. I wanted the look of warm sunlight on the model's face, and I wanted to do it without throwing off the natural color of the grass, the bricks and the sky. The trick: Place a Rosco Cinegel CTO (Color Temperature Orange) Jell over the flash and bump the flash power up about 2/3 stop. This gives the shot that afternoon sunlight look and the model's skin tones look warm. If I tried this shot without the jell and flash combination, adjusting white balance in photoshop, the results would not have been pretty. Getting it right at the moment you trip the shutter is the key. Visualize. Check your preview monitor and histogram. Fix what's not what you want, and keep shooting and checking. It works!

Paul LeGrand Photography

Paul LeGrand Photography
(click on photo to see the website)